Featured image for how to dry herbs in the oven
Image source: homesteadingfamily.com
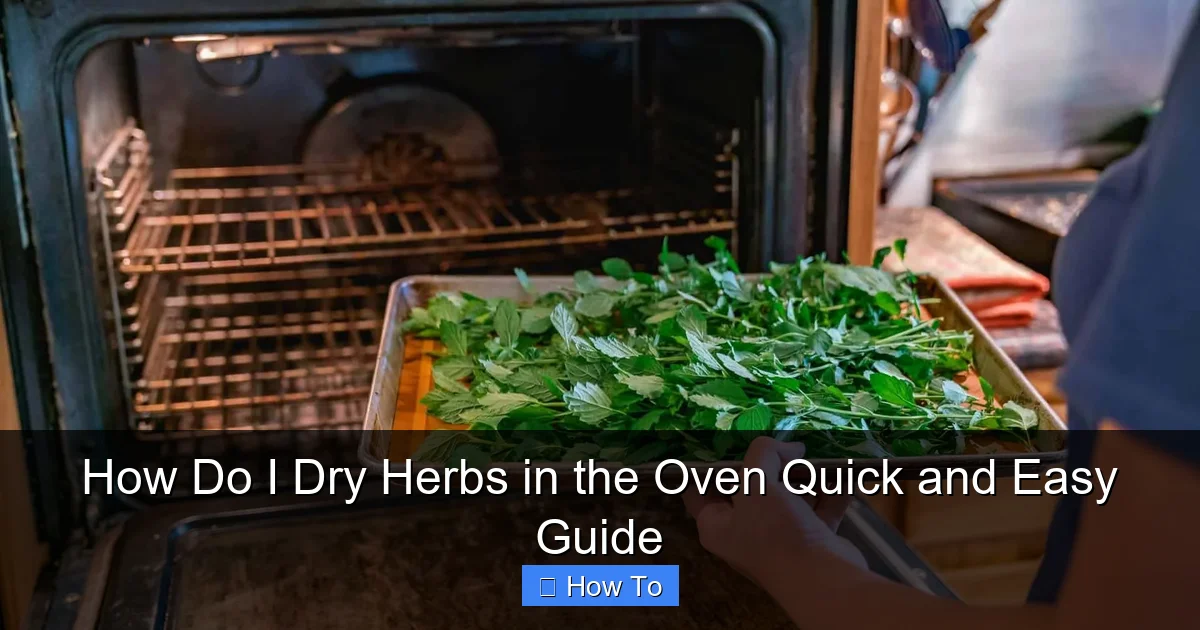
Drying herbs in the oven is the fastest and most effective way to preserve their flavor and aroma—just spread clean, dry herbs on a baking sheet and set your oven to its lowest temperature (ideally 170°F or lower). Keep the door slightly ajar to allow moisture to escape and check every 10–15 minutes to prevent burning, ensuring perfectly dried herbs in under an hour.
How to How Do I Dry Herbs in the Oven Quick and Easy Guide
Why This Matters / Understanding the Problem
Have you ever bought a big bunch of fresh basil, rosemary, or thyme, only to watch it wilt in the fridge within days? It’s frustrating—and wasteful. That’s where learning how to dry herbs in the oven quick and easy guide comes in. Drying herbs at home preserves their flavor, saves money, and reduces food waste.
While air-drying works, it takes days. Oven-drying is faster, more reliable, and perfect for busy home cooks. Whether you grow your own herbs or buy them in bulk, oven-drying lets you keep that garden-fresh taste all year. This how do I dry herbs in the oven quick and easy guide walks you through a simple, foolproof method anyone can follow—no fancy tools needed.
Plus, dried herbs last for months (or even years) when stored correctly. No more tossing out half-used bunches!
What You Need
You don’t need a dehydrator or special equipment. Most of these items are already in your kitchen. Here’s your quick checklist:
Visual guide about how to dry herbs in the oven
Image source: wikihow.com
- Fresh herbs (any kind: parsley, oregano, mint, dill, etc.)
- Oven (standard home oven works fine)
- Baking sheet (preferably with a rim to catch crumbs)
- Parchment paper or silicone baking mat (to prevent sticking and burning)
- Kitchen shears or sharp knife (for trimming stems)
- Small bowl or jar (for collecting dried leaves)
- Glass jars with tight lids (for storage—mason jars are great)
- Oven mitts (safety first!)
Bonus: A cooling rack can help speed up the process by improving airflow. But it’s optional.
This setup keeps things simple and effective. Now let’s dive into the how do I dry herbs in the oven quick and easy guide step by step.
Step-by-Step Guide to How Do I Dry Herbs in the Oven Quick and Easy Guide
Step 1: Choose and Prep Your Herbs
Start with fresh, high-quality herbs. Look for vibrant color, firm stems, and no signs of mold or yellowing. The best time to harvest or buy is in the morning, after the dew dries but before the sun gets too hot.

Visual guide about how to dry herbs in the oven
Image source: wikihow.com
Wash the herbs gently under cool running water. Pat them dry with a clean kitchen towel or paper towels. You want them as dry as possible before going into the oven—extra moisture can lead to steaming instead of drying.
Trim off any damaged leaves or thick stems. For leafy herbs like cilantro or parsley, remove the leaves from the stems. For woody herbs like rosemary or thyme, you can leave small sprigs intact or strip the leaves later.
Pro Tip: Don’t overcrowd your herbs. Work in small batches to ensure even drying. This is a key part of the how do I dry herbs in the oven quick and easy guide—rushing leads to uneven results.
Step 2: Arrange Herbs on the Baking Sheet
Line your baking sheet with parchment paper or a silicone mat. This prevents herbs from sticking and burning, especially delicate ones like basil or mint.
Spread the herbs in a single, even layer. Don’t pile them up or let them touch. Overlapping herbs trap moisture and can create mold spots. For sprigs, lay them flat with space between each. For loose leaves, spread them out like a thin carpet.
Woody herbs (rosemary, thyme, oregano) can handle closer spacing since they dry faster. Delicate herbs (basil, cilantro, parsley) need more room.
Warning: Never use aluminum foil—it can react with acidic herbs and leave a metallic taste. Stick with parchment or silicone for the safest results.
Step 3: Set Your Oven Temperature
Here’s the magic number: 170°F (77°C). This low temperature gently removes moisture without cooking the herbs or burning their oils.
Preheat your oven. Use the convection setting if you have it—it circulates air better and cuts drying time by 10–15 minutes. But a regular oven works perfectly too.
Why not higher? Temperatures above 200°F (93°C) can “cook” herbs, turning them brown and bitter. You want them to dry, not fry. This low-and-slow method is the heart of the how do I dry herbs in the oven quick and easy guide.
Pro Tip: If your oven doesn’t go below 200°F, turn it on for 2 minutes, then turn it off. Open the door slightly to keep the temp around 170°F. Use an oven thermometer to check.
Step 4: Dry the Herbs (Timing Varies)
Place the baking sheet in the center of the oven. Close the door gently—no slamming! Set a timer for 20 minutes as your starting point.
After 20 minutes, check the herbs. Gently touch them. They should feel crisp and crumble easily. If they’re still soft or leathery, leave them in for another 10–15 minutes.
Most herbs take 30 to 60 minutes total. Delicate herbs (basil, parsley) dry faster (30–40 min). Woody herbs (rosemary, thyme) take longer (50–60 min).
Open the oven door every 15 minutes to release steam. This helps prevent moisture buildup and speeds up drying.
Warning: Don’t walk away! Check every 10–15 minutes after the first 20. Herbs can go from perfect to burnt in minutes. This is especially true for thin-leaf herbs like mint.
Step 5: Cool and Test for Dryness
Once the herbs are crisp, remove the tray with oven mitts. Let them cool completely on the counter for 10–15 minutes. This is crucial—warm herbs can sweat and reabsorb moisture.
Test one leaf: snap it between your fingers. If it breaks cleanly with no bend, it’s ready. If it’s still flexible or chewy, it needs more time.
For woody herbs like rosemary, the stems may still be slightly bendy. That’s okay—just make sure the leaves are brittle.
Pro Tip: Cool herbs on a wire rack for even better airflow. This helps them dry evenly and prevents condensation.
Step 6: Remove Leaves and Store Properly
Once cooled, strip the leaves from the stems. Use your fingers or gently rub sprigs between your palms over a bowl. Discard the stems (or compost them).
Break large leaves into smaller pieces, but don’t crush them too much—whole leaves retain more flavor. For oregano or thyme, a light crumble is fine.
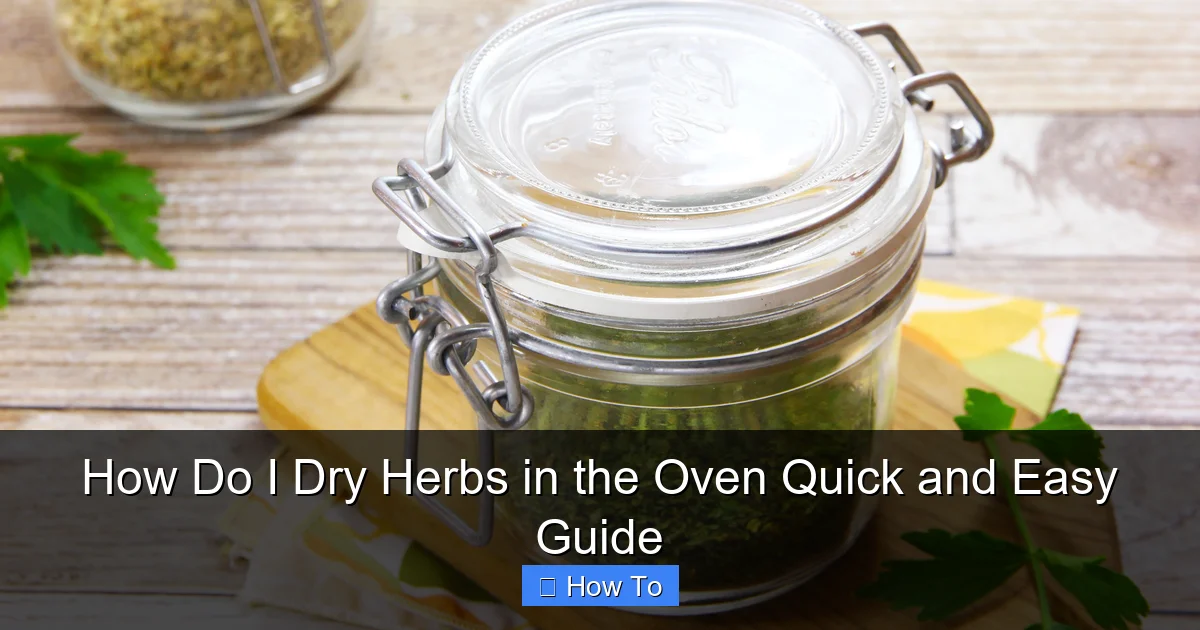
Transfer the dried herbs to airtight glass jars. Label them with the herb name and date. Store in a cool, dark place—like a kitchen cabinet away from the stove or sunlight.
Properly dried and stored herbs last 6 to 12 months for peak flavor. After that, they’re still safe but less potent.
Warning: Never store warm or moist herbs. Even a tiny bit of moisture can cause mold. Always double-check for dryness before sealing.
Pro Tips & Common Mistakes to Avoid
Even a simple process like oven-drying herbs has pitfalls. Avoid these common errors to get the best results every time:
- Overcrowding the tray: Herbs need airflow. Pile them up, and you’ll end up with damp, moldy patches.
- Using high heat: 350°F? No way! You’ll burn the herbs and lose their flavor. Stick to 170°F or lower.
- Skipping the wash: Dirt and bugs don’t belong in your spice jar. Wash herbs, but dry them thoroughly first.
- Storing in plastic bags: Plastic traps moisture and can create condensation. Use glass or ceramic instead.
- Forgetting to label: “Is this oregano or marjoram?” Save yourself the guesswork—label everything.
Pro Tip: Dry herbs in small batches. This gives you better control and prevents waste. It’s a smart move in any how do I dry herbs in the oven quick and easy guide.
Bonus Hack: Mix small amounts of different herbs (like thyme and rosemary) on the same tray—just make sure they dry at similar rates. This saves time and energy.
Also, consider drying herbs right after harvesting or buying. Freshness matters. The longer you wait, the more flavor you lose.
And don’t forget—drying intensifies flavor. Use about one-third the amount of dried herbs compared to fresh in recipes. Example: 1 tsp dried oregano = 1 tbsp fresh.
FAQs About How Do I Dry Herbs in the Oven Quick and Easy Guide
Q: Can I dry herbs in the oven without preheating?
A: Yes, but it’s not ideal. Preheating ensures a consistent, low temperature from the start. Skipping it may lead to uneven drying. For best results, follow the how do I dry herbs in the oven quick and easy guide and preheat to 170°F.
Q: What if my oven doesn’t go below 200°F?
A: No problem! Turn the oven on for 2 minutes, then turn it off. Place the herbs inside and keep the door slightly open (use a wooden spoon to prop it). The residual heat will stay around 170°F. Use an oven thermometer to confirm.
Q: Can I dry different herbs together?
A: Yes, but only if they dry at similar rates. Pair rosemary and thyme, or basil and parsley. Don’t mix fast-drying (mint) with slow-drying (thyme) herbs. They’ll finish at different times, leading to waste.
Q: How do I know if my dried herbs are still good?
A: Check for color, smell, and texture. Good dried herbs are vibrant (not brown), aromatic (not musty), and brittle. If they’re dull, dusty, or smell flat, it’s time to replace them. Most last 6–12 months.
Q: Can I use a microwave instead?
A: Technically yes, but it’s tricky. Microwaves can overheat herbs quickly, causing uneven drying or burning. The oven method is more reliable and easier to control—especially for beginners.
Q: Do I need to strip leaves before drying?
A: No. You can dry whole sprigs and strip the leaves later. But removing leaves first speeds up drying, especially for thick-stemmed herbs. It’s a personal preference.
Q: Can I dry herbs in a toaster oven?
A: Absolutely! Toaster ovens are perfect for small batches. Just use the same temperature (170°F) and check more often. It’s a great space-saving option for apartment dwellers.
Final Thoughts
Now you know how to dry herbs in the oven quick and easy guide style—simple, fast, and effective. No more wasted herbs or last-minute grocery runs. With just a baking sheet, parchment paper, and your oven, you can preserve fresh flavors for months.
Remember: low heat, single layers, and patience make all the difference. Dry herbs in small batches, store them in labeled glass jars, and keep them away from heat and light.
Next time you see a great deal on cilantro or a fresh herb bundle, go for it! Dry what you won’t use right away. You’ll save money, reduce waste, and have garden-fresh flavor at your fingertips.
Start today—grab a bunch of parsley, set your oven to 170°F, and give it a try. In under an hour, you’ll have your first batch of homemade dried herbs. And once you master this method, you’ll wonder how you ever cooked without it.
Happy drying! 🌿