Featured image for how to cook rice in the oven
Image source: thespruceeats.com
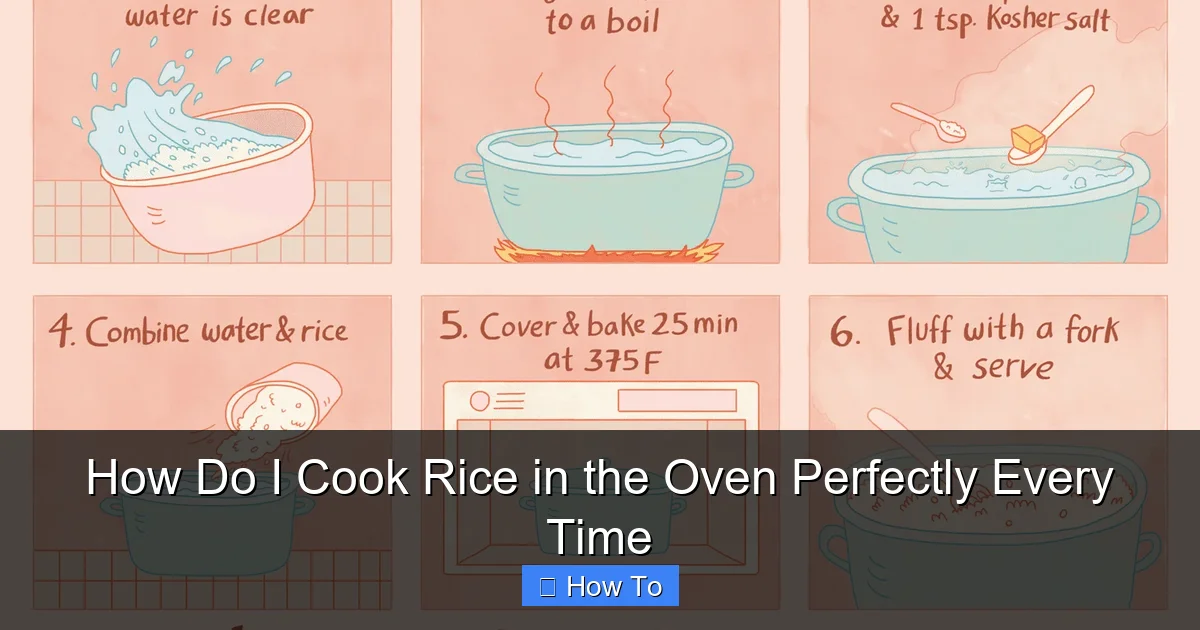
Cooking rice in the oven delivers perfectly fluffy, evenly cooked grains every time—no stirring or monitoring required. Simply combine rice, water, and a pinch of salt in a covered oven-safe dish, then bake at 375°F for 30–40 minutes; the oven’s consistent heat ensures foolproof results. It’s the hands-off method ideal for busy kitchens or batch cooking.
How to How Do I Cook Rice in the Oven Perfectly Every Time
Why This Matters / Understanding the Problem
Stovetop rice can be tricky. One wrong move and you end up with mushy, burnt, or undercooked grains. If you’ve ever stared at a pot wondering, “How do I cook rice in the oven perfectly every time?”—you’re not alone. The oven offers a hands-off, consistent method that eliminates guesswork and frees up your stove for other dishes.
Using the oven to cook rice is especially helpful when you’re roasting meat, baking casseroles, or hosting a dinner party. It’s a set-it-and-forget-it approach that delivers fluffy, evenly cooked rice without constant monitoring. This method works great for white, brown, basmati, jasmine, and even wild rice varieties.
When done right, oven-baked rice absorbs liquid evenly, develops a slightly nutty flavor, and holds its shape—perfect for grain bowls, stir-fries, or as a side dish. The key is mastering the right ratio, temperature, and timing. That’s where this guide comes in to help you answer “How do I cook rice in the oven perfectly every time?”—once and for all.
What You Need
Before you start, gather these simple tools and ingredients. Most are already in your kitchen, making this method both accessible and reliable.

Visual guide about how to cook rice in the oven
Image source: foodleclub.com
- Rice of your choice (1 cup dry, enough for 3–4 servings)
- Water or broth (1.5 to 2.5 cups, depending on rice type)
- Oven-safe baking dish (8×8-inch or 9×13-inch, glass or ceramic)
- Tight-fitting lid or aluminum foil (to trap steam)
- Measuring cups (for rice and liquid)
- Mixing spoon (wooden or silicone)
- Oven mitts (for safe handling)
- Optional extras: butter, olive oil, salt, garlic, herbs, or spices
For best results, use a dish with high sides to prevent boiling over. A glass casserole dish is ideal because you can monitor the rice through the lid or foil. If you don’t have a lid, foil works just as well—just make sure it’s sealed tightly.
This method is perfect for busy weeknights or meal prep days. Whether you’re making a side for roast chicken or prepping grains for salads, knowing how to cook rice in the oven perfectly every time saves time and stress.
Step-by-Step Guide to How Do I Cook Rice in the Oven Perfectly Every Time
Step 1: Preheat Your Oven and Choose the Right Temperature
Set your oven to 375°F (190°C) for white rice or 350°F (175°C) for brown, wild, or whole-grain rice. These temperatures prevent scorching and ensure even cooking.

Visual guide about how to cook rice in the oven
Image source: i.ytimg.com
Preheating is crucial—it ensures the rice starts cooking immediately once it hits the oven. If your oven runs hot or cold, use an oven thermometer to verify accuracy.
Pro Tip: If you’re cooking multiple dishes, this method fits right in. Roast vegetables at 375°F and your rice will cook alongside them!
Step 2: Measure and Rinse the Rice (Optional but Recommended)
Use a 1:1.5 to 1:2.5 rice-to-liquid ratio depending on the type. Here’s a quick reference:
- White rice (basmati, jasmine, long-grain): 1 cup rice + 1.5 cups liquid
- Brown rice: 1 cup rice + 2.25 cups liquid
- Wild rice blend: 1 cup rice + 2.5 cups liquid
Rinse the rice under cold water in a fine-mesh strainer for 30–60 seconds. This removes excess starch and prevents clumping. For basmati or jasmine, rinsing also improves texture and aroma.
Note: Some enriched or parboiled rice (like Uncle Ben’s) doesn’t need rinsing—check the package.
Step 3: Add Rice and Liquid to the Baking Dish
Pour the rinsed rice into your oven-safe dish. Add the correct amount of water or broth. For extra flavor, use chicken, vegetable, or mushroom broth instead of plain water.
Add a pinch of salt (¼–½ tsp), 1 tsp butter or olive oil, or a clove of minced garlic if desired. Stir gently to combine—don’t overmix, or the rice may become gummy.
Make sure the liquid covers the rice evenly. If using a larger dish, spread the rice in a thin, uniform layer for consistent cooking.
Step 4: Cover Tightly and Seal in the Steam
Cover the dish with a tight-fitting lid or aluminum foil. If using foil, press it down around the edges to create an airtight seal—this keeps steam inside, which is essential for even cooking.
Steam is the secret to fluffy, separated grains. Without a good seal, moisture escapes, and the rice dries out or cooks unevenly.
Warning: Never leave the dish uncovered in the oven. That’s the #1 reason oven rice fails—loss of steam leads to crunchy, undercooked grains.
Step 5: Bake for the Right Amount of Time
Place the dish in the center of the preheated oven. Bake for the following times:
- White rice: 30–35 minutes
- Brown rice: 45–55 minutes
- Wild rice blend: 55–65 minutes
Set a timer. Avoid opening the oven door during cooking—this drops the temperature and can cause uneven results.
After the time is up, turn off the oven but leave the dish inside for 10 minutes. This “resting” period lets the rice absorb any remaining moisture and finish steaming gently.
Step 6: Fluff and Serve
Carefully remove the dish with oven mitts. Uncover away from your face to avoid steam burns. Use a fork to gently fluff the rice from the edges toward the center.
Fluffing separates the grains without crushing them. If the rice looks dry, add a splash of warm broth or water and fluff again. If it’s too wet, return it to the oven uncovered for 5–10 minutes.
Serve immediately. Oven-cooked rice reheats well, so leftovers can be stored in an airtight container for up to 4 days.
Pro Tips & Common Mistakes to Avoid
Even with the right steps, small errors can ruin your rice. Here’s how to avoid them and get perfect results every time.
Use the Right Dish Size
Too much space = thin layer = dry, crispy edges. Too little space = overflow. For 1 cup of rice, use an 8×8-inch dish. For 2 cups, go for 9×13-inch. Adjust liquid accordingly.
Pro Tip: If doubling the recipe, increase liquid by 1.5x, not 2x. Too much liquid = mushy rice.
Don’t Skip the Resting Time
Resting allows residual heat and steam to finish the job. Skipping it means you’ll open the dish to undercooked or gummy rice. Patience pays off!
Adjust for Altitude
If you live above 3,000 feet, increase liquid by 1–2 tablespoons per cup of rice and extend baking time by 5–10 minutes. High altitude reduces boiling temperature, so rice needs more time to cook through.
Try the “Broth Swap” for Flavor
Replace water with broth for richer taste. Add a bay leaf, thyme, or a strip of lemon zest before baking for a gourmet touch. Just remember: salted broth means you may not need extra salt.
Common Mistakes
- Not sealing the dish: Steam escapes → dry, crunchy rice.
- Opening the oven early: Temperature drops → uneven cooking.
- Using too much liquid: Rice turns mushy and loses texture.
- Stirring after baking: Use a fork, not a spoon. Spoons mash the grains.
With these tips, you’ll master the answer to “How do I cook rice in the oven perfectly every time?”—and never go back to the stovetop.
FAQs About How Do I Cook Rice in the Oven Perfectly Every Time
1. Can I use a cast iron skillet instead of a baking dish?
Yes! A 10-inch cast iron skillet works great. It holds heat well and gives a nice crust if you want a “rice pilaf” effect. Just make sure it’s oven-safe and seal it tightly with foil or a lid.
2. Can I cook rice in the oven with other dishes?
Absolutely. This method is perfect for meal prep or holiday dinners. Bake your rice at 375°F alongside roasted chicken, vegetables, or a casserole. Just make sure all dishes have similar cooking times or adjust rack positions.
3. Why is my oven rice still crunchy after baking?
Usually due to insufficient liquid, a poor seal (steam escaped), or opening the oven too early. Double-check your ratio, seal tightly, and avoid peeking. If it’s still hard, add ¼ cup water, reseal, and bake 10 more minutes.
4. Can I make this with instant or quick-cook rice?
Not recommended. Instant rice is designed for fast stovetop or microwave cooking. Oven baking can make it mushy or overcooked. Stick to regular long-grain, medium-grain, or brown rice.
5. How do I store and reheat oven-cooked rice?
Let it cool, then store in an airtight container in the fridge for up to 4 days. Reheat in the microwave with a splash of water or broth, covered, for 1–2 minutes. Or warm in a saucepan on low heat, stirring occasionally.
6. Can I add frozen peas or corn before baking?
Yes! Add ½ cup frozen peas or corn with the liquid. They’ll thaw and cook perfectly in the steam. For firmer texture, add them after baking and stir in gently.
7. Is this method better than stovetop?
For consistency and hands-off cooking, yes. The oven eliminates hot spots and reduces the risk of burning. It’s especially great for large batches or when multitasking. But stovetop is faster for small amounts. Choose based on your needs!
Final Thoughts
Now you know the secret to answering “How do I cook rice in the oven perfectly every time?”—and it’s simpler than you think. With the right ratio, a sealed dish, and a little patience, you’ll get fluffy, flavorful rice that pairs perfectly with any meal.
This method is ideal for busy cooks, meal preppers, or anyone tired of babysitting a pot on the stove. It’s reliable, repeatable, and fits seamlessly into your weekly rotation.
So next time you’re planning a roast dinner, a grain bowl, or just need a side dish, skip the stovetop and try the oven. Measure, pour, seal, bake, rest, fluff—and enjoy perfectly cooked rice every single time.
Ready to try it tonight? Grab your baking dish, pick your favorite rice, and let the oven do the work. Your future self will thank you.