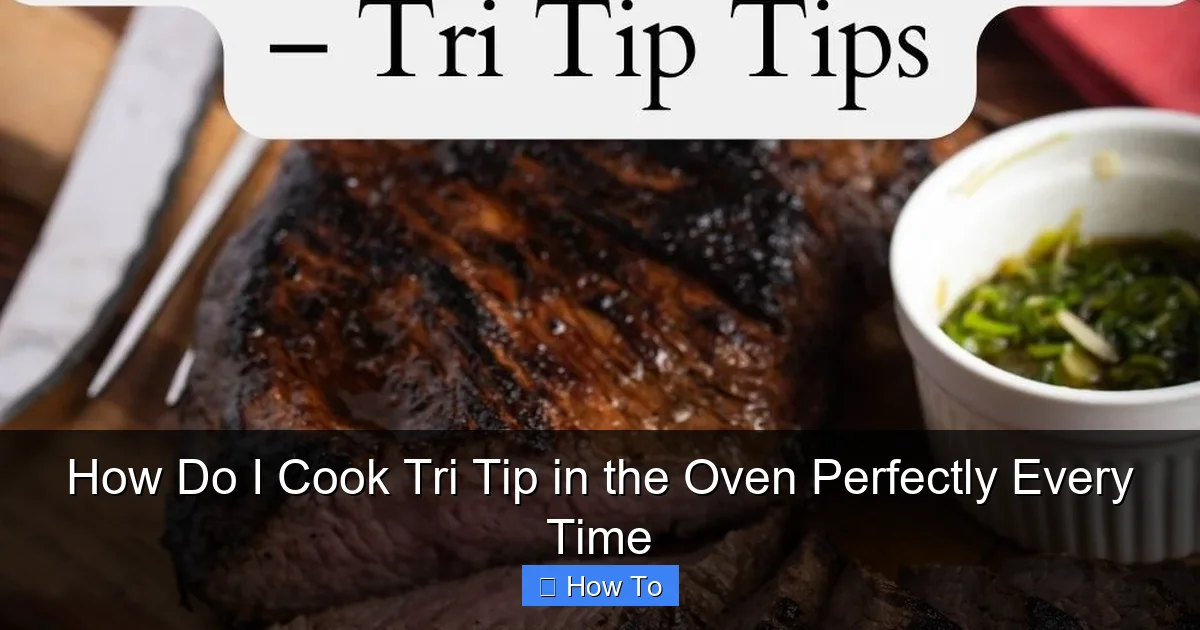
Featured image for how to cook tri tip in the oven
Image source: i.pinimg.com
Cooking tri tip in the oven perfectly every time starts with a high-heat sear (425°F) to lock in juices, followed by precise timing (15–20 minutes per pound) to achieve a tender medium-rare. Use a meat thermometer to hit 130–135°F internally, then let it rest for 10 minutes to redistribute flavors. Pair with a simple seasoning blend or marinade for foolproof, restaurant-quality results.
“`html
How to How Do I Cook Tri Tip in the Oven Perfectly Every Time
Why This Matters / Understanding the Problem
Cooking tri tip in the oven can be tricky—overcook it, and you end up with a tough, chewy disappointment. Undercook it, and you risk serving something unsafe and unappetizing. If you’ve ever asked, “How do I cook tri tip in the oven perfectly every time?”, you’re not alone. This lean, marbled cut of beef deserves respect: it’s flavorful, affordable, and versatile, but only if cooked right.
Unlike brisket or chuck roast, tri tip doesn’t need 12 hours in a slow cooker. It shines with a high-heat sear and gentle oven finish. The key is balancing internal temperature, timing, and technique. When done correctly, you get a juicy, rosy center with a savory, crusty exterior—ideal for family dinners, meal prep, or impressing guests. Mastering this method means no more guessing, no more dry meat, and no more stress.
Whether you’re a beginner or a home cook looking to refine your skills, this guide will help you nail the perfect oven-baked tri tip—every single time.
What You Need
Before diving in, gather your tools and ingredients. You don’t need fancy equipment—just a few essentials to ensure consistent results when you’re figuring out how to cook tri tip in the oven perfectly every time.

Visual guide about how to cook tri tip in the oven
Image source: dinnerthendessert.com
- Tri tip roast (2–3 pounds, trimmed of excess fat but with a thin layer for flavor)
- Oven-safe skillet (cast iron or heavy stainless steel for searing)
- Meat thermometer (digital instant-read is best)
- Aluminum foil (for resting)
- Oven mitts (safety first!)
- Cutting board (with juice groove)
- Sharp chef’s knife
- Basic seasonings: kosher salt, freshly ground black pepper, garlic powder, onion powder, smoked paprika (optional)
- Oil with high smoke point: avocado, canola, or grapeseed oil
- Optional extras: fresh herbs (rosemary, thyme), Worcestershire sauce, or your favorite dry rub
Pro Tip: Always start with a room-temperature tri tip. Take it out of the fridge 30–45 minutes before cooking. Cold meat won’t sear properly, leading to uneven cooking—a common mistake when people wonder, “How do I cook tri tip in the oven perfectly every time?”
Step-by-Step Guide to How Do I Cook Tri Tip in the Oven Perfectly Every Time
Step 1: Trim and Season the Tri Tip
Start by inspecting your tri tip. It usually comes with a thick layer of fat and silver skin on one side. Use a sharp knife to trim the fat down to about 1/8 inch—this keeps it from getting rubbery. Remove any silver skin (the tough, shiny membrane), as it won’t soften during cooking.
Visual guide about how to cook tri tip in the oven
Image source: traditionandthyme.com
Pat the roast dry with paper towels. Moisture is the enemy of a good sear. Then, generously season all sides with salt, pepper, garlic powder, and onion powder. For extra depth, add smoked paprika or a sprinkle of dried rosemary. Let it sit for 15–20 minutes to let the salt penetrate—this boosts flavor and helps form a better crust.
Warning: Don’t skip drying the surface. Wet meat steams instead of sears, ruining texture and flavor. This step is crucial if you want to know how to cook tri tip in the oven perfectly every time.
Step 2: Sear the Meat on the Stovetop
Place your oven-safe skillet (cast iron works best) over medium-high heat. Add 1–2 tablespoons of high-smoke-point oil and heat until it shimmers—about 2–3 minutes. You’ll know it’s ready when a drop of water sizzles and evaporates instantly.
Carefully place the tri tip in the pan, fat-side down first. Sear for 3–4 minutes per side, including the ends, until you get a deep golden-brown crust. Don’t move it around—let the pan do its work. A good sear locks in juices and adds rich, caramelized flavor (called the Maillard reaction).
Once all sides are seared, remove the skillet from the heat. You’re now ready to move it to the oven. This two-step method (sear + roast) is the secret to restaurant-quality results.
Step 3: Preheat and Roast in the Oven
While searing, preheat your oven to 425°F (220°C). This high temperature ensures fast, even cooking without drying out the meat. Once the tri tip is seared, place the skillet directly into the oven (no need to transfer).
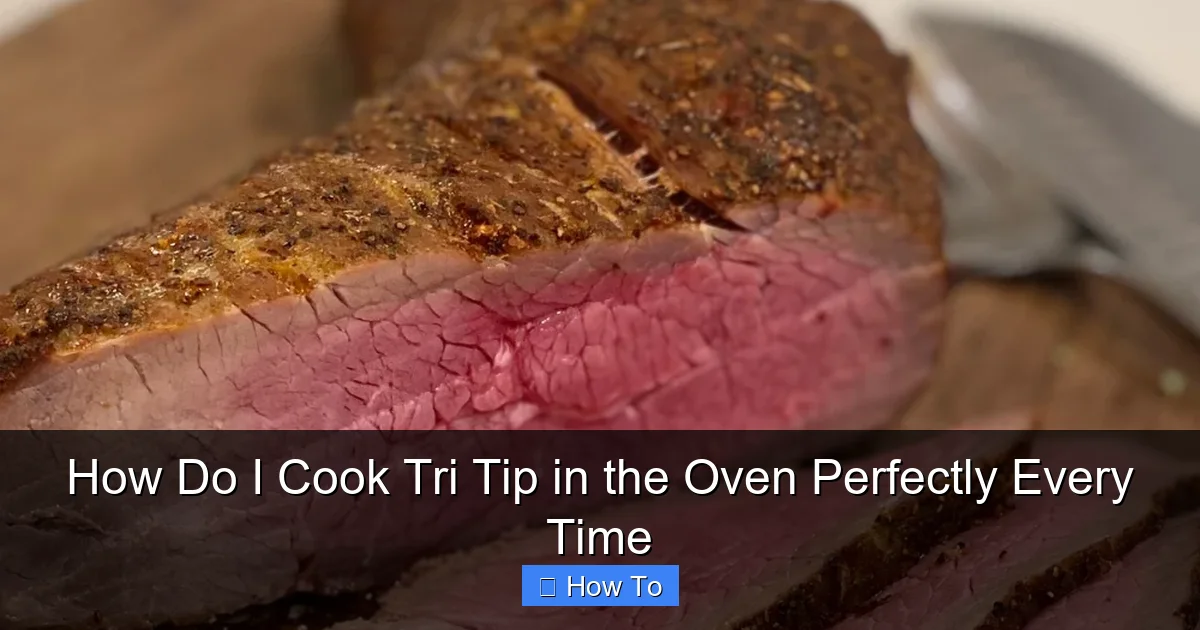
Roast for 15–25 minutes, depending on the thickness of your cut. The goal is to reach an internal temperature of:
- 125°F for rare (bright red center)
- 130–135°F for medium-rare (pink, warm center—most popular)
- 140°F for medium (slightly pink, firmer texture)
Use your meat thermometer to check the thickest part, avoiding bone or fat pockets. For a 2.5-pound roast, medium-rare usually takes about 20 minutes. Remember: the meat will rise 5–10°F while resting.
Pro Tip: If you don’t have a thermometer, the “touch test” can help: medium-rare feels like the base of your thumb when you touch your index finger to your thumb. But a thermometer is far more reliable when learning how to cook tri tip in the oven perfectly every time.
Step 4: Rest the Meat (Don’t Skip This!)
Once your tri tip hits the target temp, remove the skillet from the oven. Place the roast on a cutting board and loosely tent it with aluminum foil. Let it rest for 15–20 minutes.
Resting is non-negotiable. It allows the juices to redistribute, so your slices won’t leak all over the plate. Think of it as giving the meat a break—like letting a hot coffee cool before drinking. During this time, the internal temp will rise slightly (carryover cooking), so pull it 5°F below your final goal.
While it rests, you can prepare sides like roasted potatoes, garlic green beans, or a fresh arugula salad.
Step 5: Slice Against the Grain
Tri tip has a unique grain structure—it changes direction halfway through. Look closely: you’ll see long muscle fibers running one way on one side, then switching on the other.
To slice properly, cut the roast in half first. Then, slice each section perpendicular to the grain (about 1/4 inch thick). This shortens the muscle fibers, making every bite tender and easy to chew. If you slice with the grain, you’ll end up with chewy, stringy meat—no matter how perfectly you cooked it.
Serve immediately with your favorite sides. Drizzle with pan juices or a simple red wine reduction for extra flair.
Pro Tips & Common Mistakes to Avoid
Even with the right steps, small errors can ruin your tri tip. Here’s how to avoid them and elevate your results.
- Use a thermometer: Guessing leads to overcooking. A $15 digital thermometer pays for itself in saved meat.
- Don’t skip the sear: Baking without searing gives you boiled-tasting meat. The crust adds flavor and texture.
- Avoid overcrowding the pan: If your skillet is too small, sear in batches or use two pans. Overcrowding lowers the pan temp.
- Let it rest: Cutting too soon = juice runoff = dry slices. Patience pays off.
- Season in advance: Salting 30+ minutes before cooking (or even overnight) enhances moisture retention and flavor.
- Adjust for thickness: A 3-inch-thick roast needs more time than a 2-inch one. Use time as a guide, but rely on temperature.
- Reheat gently: Leftovers? Warm in a 250°F oven for 10–15 minutes, then slice. Microwaving dries it out fast.
Warning: Never bake a tri tip straight from the fridge. Cold meat cooks unevenly—the outside overcooks before the inside is done. Always bring it to room temperature first. This is a top reason people fail when they ask, “How do I cook tri tip in the oven perfectly every time?”
For extra flavor, try a simple marinade (soy sauce, olive oil, garlic, rosemary) for 2–4 hours. But don’t overdo it—tri tip has great natural taste. A dry brine (salt + seasonings overnight) also works wonders.
FAQs About How Do I Cook Tri Tip in the Oven Perfectly Every Time
Q1: Can I cook tri tip without searing?
A: Technically yes, but you’ll miss out on flavor and texture. Searing creates a delicious crust and enhances taste. If you’re short on time, at least broil it for 1–2 minutes per side before roasting. But for the best results, sear first.
Q2: How long does a 3-pound tri tip take in the oven?
A: At 425°F, expect 20–25 minutes for medium-rare. Always check internal temp—don’t rely on time alone. A 3-pound roast may take longer than a 2-pounder due to thickness.
Q3: Is tri tip the same as a sirloin?
A: No. Tri tip comes from the bottom sirloin, but it’s more tender and marbled than regular sirloin. It’s also triangular in shape and has a distinct grain pattern.
Q4: Can I use a baking sheet instead of a skillet?
A: You can, but you’ll need to sear in a pan first, then transfer. A cast iron skillet is ideal because it retains heat and goes straight from stovetop to oven. If using a sheet pan, sear separately, then place the meat on a rack to roast.
Q5: What temperature should tri tip be when I pull it out?
A: Pull it at 125°F for rare, 130°F for medium-rare, and 135°F for medium. It will rise 5–10°F while resting. For example, 130°F in the oven becomes 135–140°F after rest.
Q6: Can I cook frozen tri tip?
A: Not recommended. Cooking from frozen leads to uneven results—the outside may overcook before the center thaws. Always thaw in the fridge overnight. If you’re in a rush, use the cold water method (sealed bag, submerged for 1–2 hours).
Q7: How do I know when it’s done without a thermometer?
A: Use the touch test: medium-rare feels like the soft part of your palm below your thumb when you touch your index finger to your thumb. But for consistency, a thermometer is best. It’s the only way to truly master how to cook tri tip in the oven perfectly every time.
Final Thoughts
Learning how to cook tri tip in the oven perfectly every time isn’t about magic—it’s about mastering a few simple steps: trim, season, sear, roast, rest, and slice. With the right tools and a little patience, you can turn this underrated cut into a show-stopping centerpiece.
Remember: temperature is your best friend. Don’t guess—measure. Resting is just as important as cooking. And slicing against the grain makes all the difference in tenderness.
Next time you’re planning a weeknight dinner or hosting a backyard cookout, give this method a try. You’ll impress your family, save money, and enjoy juicy, flavorful beef that’s anything but ordinary. Keep a meat thermometer handy, follow the steps, and you’ll never ask, “How do I cook tri tip in the oven perfectly every time?” again—because you’ll already know the answer.
Now go fire up that oven and cook with confidence!
“`