Featured image for how to bake clay in the oven
Image source: wikihow.com
Baking clay in the oven perfectly starts with precise temperature control—always follow the manufacturer’s recommended heat settings to avoid cracking or burning. Preheat your oven, place clay pieces on a parchment-lined tray, and bake for the exact time specified, monitoring closely to ensure even curing. Consistent timing, proper spacing, and avoiding sudden temperature changes are key to flawless results every time.
How to How Do You Bake Clay in the Oven Perfectly Every Time
Why This Matters / Understanding the Problem
You’ve spent hours shaping your clay creation—maybe a handmade mug, a quirky sculpture, or tiny charms for jewelry—only to open the oven and find cracks, warping, or a piece that’s still soft in the center. Sound familiar? Baking polymer clay isn’t as simple as setting a timer and walking away. How do you bake clay in the oven perfectly every time? That’s the real question.
Unlike regular cooking, clay baking is a science. Too hot, and it burns. Too cold, and it stays undercured. Uneven heat causes warping or weak spots. And if you’ve ever ruined a favorite project because the oven didn’t heat evenly, you’re not alone. The good news? With the right method, you can get perfectly baked clay consistently—no more guessing games.
Whether you’re a beginner or a seasoned crafter, mastering the process ensures your creations are durable, safe, and ready to use. From oven-safe containers to precise temperature control, this guide will walk you through how do you bake clay in the oven perfectly every time—without the stress.
What You Need
Before you preheat, gather these essentials. Having the right tools makes all the difference in achieving a flawless bake.
Visual guide about how to bake clay in the oven
Image source: cdn.shopify.com
- Polymer clay (brands like Sculpey, Fimo, or Premo work best)
- Oven-safe container (a metal baking pan, ceramic dish, or dedicated clay oven tray)
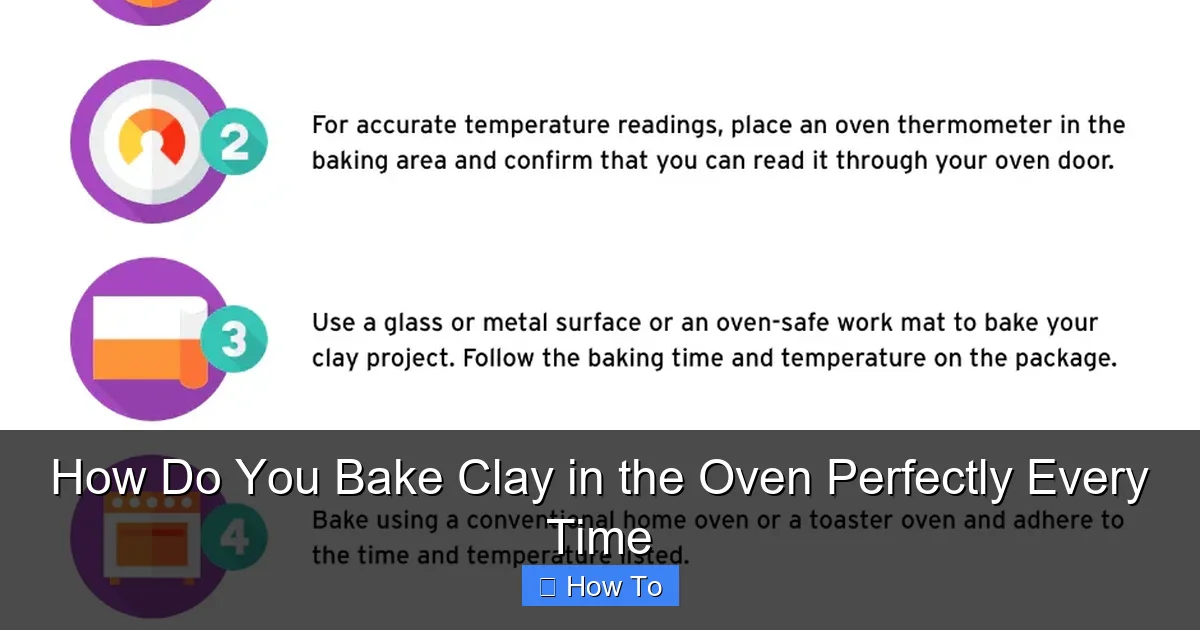
- Oven thermometer (critical—your oven dial isn’t always accurate)
- Parchment paper or oven-safe clay mat (to prevent sticking and scorching)
- Aluminum foil (optional, for shielding delicate areas)
- Toothpicks or clay shapers (for propping up pieces if needed)
- Timer (phone, kitchen timer, or oven timer)
- Ventilation (open a window or turn on a fan—clay can release fumes)
Pro Tip: Never bake clay in a toaster oven unless it’s specifically rated for polymer clay. Many home ovens vary by up to 50°F. An oven thermometer is your best friend—it shows the true temperature inside.
Step-by-Step Guide to How Do You Bake Clay in the Oven Perfectly Every Time
Step 1: Prepare Your Workspace and Clay
Start with a clean, dust-free surface. Dust can get baked into the clay, leaving tiny imperfections. Knead your clay thoroughly—this warms it up and removes air bubbles. Cold clay is stiff and harder to shape evenly.
Visual guide about how to bake clay in the oven
Image source: i.ytimg.com
Roll, sculpt, or mold your piece according to your design. For thin parts (like arms on a figurine), make sure they’re not too delicate. Thick areas should be no more than 1/4 inch (6 mm) for even baking.
Place your finished piece on a parchment-covered baking tray. This prevents sticking and protects the clay from hot spots on the metal. If you’re making a hollow piece, consider using clay beads or foil stuffing to maintain shape and reduce baking time.
Warning: Never place clay directly on a bare metal tray. It can scorch or stick, especially with darker clays. Parchment paper is cheap insurance.
Step 2: Set the Correct Oven Temperature
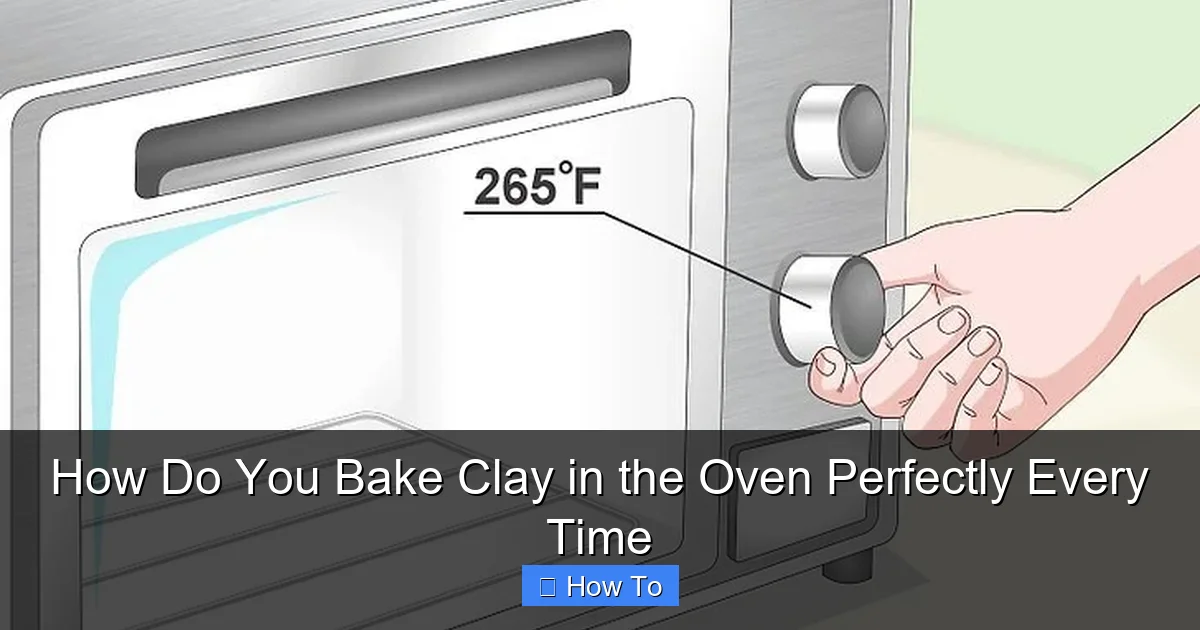
This is where most people go wrong. How do you bake clay in the oven perfectly every time? It starts with temperature control. Most polymer clays require baking between 265°F and 275°F (129°C–135°C).
Check the clay package for the exact temperature. For example, Sculpey Original bakes at 275°F, while Premo! Sculpey recommends 275°F for 30 minutes per 1/4 inch. Fimo Professional is best at 230°F (110°C)—lower than many expect.
Preheat your oven to the correct temp. Then, place your oven thermometer inside to verify. Let it sit for 10 minutes to stabilize. If it reads 285°F but your dial says 275°F, you’ve got a hot spot—adjust accordingly.
Never guess. A 10°F difference can mean the difference between perfect and cracked clay.
Step 3: Position the Clay in the Oven
Place your tray in the center of the oven—this is the most consistent heat zone. Avoid the top or bottom racks, which are prone to hot spots.
If you’re baking multiple pieces, space them at least 1 inch apart. Crowding blocks heat flow and can cause uneven curing. For tall or delicate pieces (like a standing figurine), use toothpicks or clay supports to keep them upright.
For pieces with thin, exposed areas (like a bird’s wing), cover them loosely with aluminum foil. This acts as a heat shield, preventing scorching while still allowing curing.
Pro Tip: If you’re baking a large or thick piece, consider placing a second baking tray on the rack above to diffuse heat and prevent top scorching.
Step 4: Bake for the Right Time
Timing is everything. Underbaking leaves clay soft and weak. Overbaking can darken or burn it.
Follow the clay manufacturer’s guidelines. A general rule: bake for 30 minutes per 1/4 inch (6 mm) of thickness. For example, a 1/2-inch-thick piece needs 60 minutes.
Start the timer after the oven reaches the correct temperature. Don’t open the oven during baking—heat loss can cause cracking. Set a kitchen timer or phone alarm so you don’t lose track.
For complex pieces with varying thicknesses, bake based on the thickest section. Thin parts will cure faster, but thick areas need time to fully harden.
Step 5: Monitor and Avoid Overbaking
Keep an eye on the clock, but also watch for visual cues. Light-colored clays (like white or yellow) can turn brown if overheated. Darker clays may look slightly shiny when properly cured.
If your clay starts to smoke, turn off the oven immediately and ventilate the area. Smoke means the clay is burning—this releases harmful fumes. Never inhale them.
Once the timer goes off, leave the clay in the oven. Turn off the heat and let it cool slowly for 30–60 minutes. Rapid cooling (like removing it right away) can cause thermal shock and cracking.
Warning: Never bake clay above 300°F (149°C). Most polymer clays degrade at higher temps, becoming brittle or releasing toxic fumes.
Step 6: Test for Proper Curing
After cooling, check your piece. A properly baked clay item should be firm, not soft or rubbery. Gently press a fingernail into an inconspicuous spot. If it leaves a mark, it’s underbaked.
You can also tap it lightly—fully cured clay makes a crisp, “clinky” sound. Soft or dull sounds mean it needs more time. If it’s undercured, re-bake it for an additional 10–15 minutes at the same temperature.
For peace of mind, some crafters use a clay curing test strip—a small sample baked alongside the main piece to verify conditions.
Step 7: Clean Up and Store Properly
Let your clay piece cool completely before handling. Then, gently peel off the parchment paper. If it sticks, use a soft brush or your fingers—no scraping.
Store unused clay in an airtight container, away from heat and sunlight. Baked pieces can be sanded, drilled, or painted (with acrylics) once fully cured.
Clean your baking tray with warm, soapy water. Avoid harsh abrasives that could damage the surface.
Pro Tips & Common Mistakes to Avoid
Even with the right tools, small mistakes can ruin your project. Here’s how to avoid them:
- Don’t skip the oven thermometer: Oven dials lie. A thermometer ensures your oven is actually at the temp you set.
- Never bake clay with food: Use a separate oven or tray. Cross-contamination and fumes are health risks.
- Prevent scorching with foil: Loosely cover light-colored or thin areas to avoid dark spots.
- Don’t rush cooling: Let clay cool in the oven. This prevents cracks from thermal shock.
- Check clay expiration dates: Old clay may not cure properly, even with perfect baking.
- Use a dedicated clay tray: Once a tray has baked clay, it’s best not to use it for food.
Pro Tip: For large batches, bake in stages. Ovens have limited space, and stacking trays blocks airflow. Rotate pieces halfway through for even heat.
One common mistake? Assuming all clays bake the same. Always check the brand’s instructions. Premo! Sculpey needs a longer bake time than Fimo, for example.
Another? Baking at too high a temperature to “save time.” This almost always leads to burning. How do you bake clay in the oven perfectly every time? Patience and precision—not speed.
FAQs About How Do You Bake Clay in the Oven Perfectly Every Time
Q: Can I bake clay in a toaster oven?
A: Only if it’s specifically rated for polymer clay and has a thermostat. Many toaster ovens have uneven heat and can’t maintain low temps. Use an oven thermometer and test with a small piece first.
Q: Why does my clay crack after baking?
A: Cracks usually happen from rapid cooling or underbaking. Always let clay cool slowly in the oven. Also, avoid thin, unsupported sections—they cool too fast and crack.
Q: Is it safe to bake clay at home?
A: Yes, if done properly. Use proper ventilation, never exceed 300°F, and avoid burning. Baking releases trace fumes—open a window or use a fan. Never bake clay with food.
Q: Can I re-bake clay if it’s undercured?
A: Yes. Just place it back in the oven for an additional 10–15 minutes at the same temperature. Make sure it’s fully cooled first.
Q: Do I need to cover my clay while baking?
A: Not usually, but use aluminum foil to shield thin or light-colored areas. Avoid plastic or non-oven-safe covers—they can melt or catch fire.
Q: How thick can I make my clay piece?
A: Aim for 1/4 inch (6 mm) or less. Thicker pieces need longer baking and risk undercuring in the center. For large sculptures, bake in sections or use foil stuffing.
Q: What if my oven doesn’t go below 300°F?
A: Use a clay oven thermometer and set the oven to its lowest setting. Monitor closely—many ovens cycle on and off, keeping the actual temp lower than the dial shows.
🎥 Related Video: How to bake Polymer Clay for Beginners
📺 makoccino
Hey everybody! I got so many questions on how to bake polymer clay so I decided to make a short video about it. It covers what …
Final Thoughts
Baking clay isn’t magic—it’s method. With the right tools, attention to temperature, and a little patience, you can master how do you bake clay in the oven perfectly every time. No more cracked mugs, no more wasted clay, no more guessing.
Start simple: use an oven thermometer, follow the clay’s instructions, and let your pieces cool slowly. Once you nail the basics, you’ll gain confidence to try complex designs, layered colors, and even clay-to-metal techniques.
Remember, every crafter has had a “disaster piece.” The key is learning from it. Keep a clay journal—note the brand, temp, time, and outcome. Over time, you’ll develop your own perfect routine.
Now, preheat that oven, grab your clay, and create something amazing. Your next masterpiece is just a perfect bake away.