Roasting hatch chiles in the oven is simple and delivers incredible smoky flavor. This guide covers everything from selecting the best chiles to broiling, steaming, and peeling them perfectly. Master this technique and enjoy authentic roasted hatch chiles year-round.
There is nothing quite like the smoky, rich flavor of freshly roasted Hatch chiles. If you have ever visited New Mexico during chile season, you know the intoxicating aroma that fills the air. But you do not have to travel to the Southwest to enjoy this culinary treasure. Learning how to roast hatch chiles in oven is surprisingly easy and gives you that same authentic, restaurant-quality result right at home.
Hatch chiles are a seasonal gem. They are only available fresh for a few weeks each year, typically from late July through September. Roasting and freezing them is the best way to preserve that incredible flavor. Whether you want to make green chile stew, top your burgers, or add them to your favorite breakfast dishes, oven-roasted Hatch chiles are a game-changer in the kitchen.
Key Takeaways
- Choose thick-walled chiles: Look for fresh, firm Hatch chiles with smooth skin and no blemishes for the best roasting results.
- Use the broiler setting: Your oven’s broiler provides the intense, direct heat needed to blister and char the skin evenly.
- Rotate for even charring: Flip chiles halfway through roasting to ensure uniform blistering on all sides.
- Steam to loosen skins: After roasting, let chiles steam in a covered bowl for 10-15 minutes to make peeling effortless.
- Store properly: Roasted chiles freeze beautifully for up to 6 months, so you can enjoy that summer flavor all year long.
- Safety first: Always wear gloves when handling hot chiles and avoid touching your face to prevent irritation.
Quick Answers to Common Questions
What temperature should I use to roast Hatch chiles in the oven?
Use the broiler setting on your oven, which typically reaches 500-550°F. Position the oven rack 4-6 inches below the broiler element for the best results.
How long does it take to roast Hatch chiles in the oven?
It takes approximately 10-16 minutes total, flipping the chiles halfway through. The exact time depends on the size of the chiles and the power of your broiler.
Do I need to oil the chiles before roasting?
It is not required, but lightly coating them with cooking oil can help the skin blister more evenly and prevent sticking to the pan.
Can I roast other types of peppers using this method?
Absolutely. Anaheim, poblano, jalapeño, and bell peppers can all be roasted using the same oven broiler method with great results.
Why are my Hatch chiles not blistering properly?
Your broiler may not be hot enough, or the rack may be too far from the heat source. Make sure to preheat the broiler fully and position the rack 4-6 inches from the element.
📑 Table of Contents
- What Are Hatch Chiles and Why Roast Them?
- Choosing the Best Hatch Chiles for Oven Roasting
- Preparing Your Oven for Roasting Hatch Chiles
- Step-by-Step Guide: How to Roast Hatch Chiles in Oven
- Common Mistakes When Roasting Hatch Chiles in Oven
- How to Store Roasted Hatch Chiles
- Delicious Ways to Use Roasted Hatch Chiles
- Comparing Roasting Methods: Oven vs. Grill vs. Stovetop
- Tips for Roasting Hatch Chiles in Oven Like a Pro
- Safety Tips When Handling Hot Hatch Chiles
- Frequently Asked Questions About Roasting Hatch Chiles
- Conclusion
What Are Hatch Chiles and Why Roast Them?
Hatch chiles are a variety of New Mexico chile peppers grown primarily in the Hatch Valley of southern New Mexico. They come in different heat levels, ranging from mild to extra hot. The most popular varieties include Big Jim, Sandia, and Joe Parker. Each variety offers a slightly different flavor profile and heat level, but all share that distinctive earthy, slightly sweet taste.
So why roast them? Roasting hatch chiles in the oven transforms them completely. The high heat blisters and chars the tough outer skin, making it easy to peel away. More importantly, roasting develops a deep, smoky flavor that you simply cannot get from eating them raw. The natural sugars caramelize, the flesh softens, and the overall flavor becomes richer and more complex.
Roasted Hatch chiles are incredibly versatile. You can use them in salsas, soups, casseroles, sandwiches, and even on pizza. They freeze well, so a big batch can last you months. Once you master this technique, you will find yourself roasting chiles every single season.
Choosing the Best Hatch Chiles for Oven Roasting
Not all chiles are created equal. When selecting Hatch chiles for roasting, you want to pick the right ones. Here is what to look for:
What to Look For
- Firm and plump: The chiles should feel heavy for their size and have a firm texture. Avoid any that feel soft or limp.
- Smooth, unblemished skin: Look for chiles with shiny, wrinkle-free skin. Small blemishes are fine, but avoid chiles with dark spots or cuts.
- Thick walls: Thicker-walled chiles roast better and yield more flesh after peeling. Big Jim variety is a great choice for this reason.
- Bright green color: Fresh Hatch chiles should be a vibrant green. Yellowish or dull chiles may be past their prime.
- Fresh stems: If the stems are still attached, they should look green and fresh, not dried out or brown.
How Many Chiles Should You Buy?
A good rule of thumb is that one pound of raw Hatch chiles yields about one to one and a half cups of roasted, peeled, and chopped chiles. If you plan to freeze them in batches, consider buying at least five to ten pounds. Trust me, they go fast once you start adding them to everything.
Preparing Your Oven for Roasting Hatch Chiles
Proper preparation makes all the difference. Before you even touch the chiles, get your oven and workspace ready.
Setting Up Your Broiler
The broiler is your best friend for roasting hatch chiles in oven. Broilers provide intense, direct heat from above, which is exactly what you need to blister the skin quickly. Here is how to set it up:
- Position your oven rack: Place the rack about 4 to 6 inches below the broiler element. This distance gives you enough heat to char the chiles without burning them too quickly.
- Preheat the broiler: Turn on the broiler setting and let it heat up for at least 5 to 10 minutes. You want it screaming hot before the chiles go in.
- Line a baking sheet: Use a rimmed baking sheet lined with aluminum foil for easy cleanup. The foil reflects heat and makes washing up a breeze.
Preparing the Chiles
Before roasting, give the chiles a quick rinse under cold water and pat them dry thoroughly. Some people like to lightly coat the chiles with a thin layer of cooking oil. This helps the skin blister evenly and prevents sticking. However, it is not strictly necessary.
Quick Tip: Poke a small hole in each chile with a knife or fork before roasting. This allows steam to escape and prevents the chiles from bursting in the oven.
Step-by-Step Guide: How to Roast Hatch Chiles in Oven
Now comes the fun part. Follow these steps for perfectly roasted Hatch chiles every single time.
Step 1: Arrange Chiles on the Baking Sheet
Place the chiles in a single layer on your foil-lined baking sheet. Make sure they are not touching each other. Each chile needs direct exposure to the broiler heat. If they are crowded, they will steam instead of char, and you will not get that smoky flavor.
Step 2: Broil the Chiles
Slide the baking sheet under the broiler. Let the chiles roast for about 5 to 8 minutes on the first side. You are looking for the skin to become dark, blistered, and slightly blackened. Do not worry if they look burnt in spots. That char is exactly what you want.
Step 3: Flip and Roast the Other Side
Using tongs, carefully flip each chile over. Roast the second side for another 5 to 8 minutes. The total roasting time will vary depending on the size of your chiles and the power of your broiler. Keep a close eye on them, especially during the last few minutes.
Step 4: Check for Doneness
Your chiles are done when the skin is blistered and charred all over. The flesh underneath should feel soft when pressed gently with tongs. If some areas are not charred, you can leave them under the broiler for an extra minute or two.
Step 5: Steam the Chiles
This is a crucial step that many people skip. Transfer the hot chiles to a large bowl and cover it tightly with plastic wrap or a lid. You can also place them in a paper bag and roll the top closed. Let them steam for 10 to 15 minutes.
Why steam? The steam loosens the charred skin from the flesh, making peeling incredibly easy. Without this step, you will spend forever trying to scrape off stubborn skin.
Step 6: Peel and Clean the Chiles
Once the chiles have cooled enough to handle, it is time to peel. Put on a pair of disposable gloves. The oils from hot chiles can irritate your skin, so gloves are a must.
Gently pull the charred skin away from the flesh. It should slip off easily in large pieces. Do not worry about getting every last bit of char. A few flecks of blackened skin add flavor. Remove the stem and the seed pod inside. You can leave the seeds in if you want extra heat.
Expert Insight: Do not rinse the chiles under water to remove the skin. This washes away the smoky flavor you worked so hard to create. Just peel them dry.
Common Mistakes When Roasting Hatch Chiles in Oven
Even though the process is straightforward, there are a few pitfalls to avoid.
Mistake 1: Not Using High Enough Heat
If your broiler is not hot enough, the chiles will soften without blistering properly. Make sure to preheat the broiler fully and position the rack close enough to the element.
Mistake 2: Overcrowding the Pan
Give each chile plenty of space. Overcrowding leads to uneven roasting and steaming instead of charring. If you have a large batch, roast in multiple rounds.
Mistake 3: Skipping the Steaming Step
I cannot stress this enough. Skipping the steaming step makes peeling a nightmare. Always let the chiles steam in a covered bowl or bag.
Mistake 4: Roasting at the Wrong Temperature
Some people try to roast chiles at 350 or 400 degrees Fahrenheit. This will cook the chiles through but will not give you the charred, blistered skin you need. Always use the broiler setting for the best results.
How to Store Roasted Hatch Chiles
One of the best things about roasting a big batch is that you can store them for months.
Refrigerator Storage
Place peeled chiles in an airtight container. They will keep in the refrigerator for up to one week. You can also drizzle a little olive oil over them to keep them from drying out.
Freezer Storage
Freezing is the best long-term option. Here is how to do it:
- Lay chiles flat on a baking sheet: Arrange peeled chiles in a single layer on a parchment-lined baking sheet.
- Flash freeze: Place the baking sheet in the freezer for 2 to 3 hours until the chiles are frozen solid.
- Transfer to freezer bags: Move the frozen chiles to zip-top freezer bags. Squeeze out as much air as possible.
- Label and date: Write the date on the bag so you know when they were roasted.
Frozen roasted Hatch chiles will keep for up to 6 months. You can pull out a few whenever you need them. They thaw quickly and taste almost as good as fresh.
Delicious Ways to Use Roasted Hatch Chiles
Now that you have a pile of beautifully roasted chiles, what do you do with them? Here are some of my favorite ideas:
- Green chile stew: A classic Southwestern dish with pork, potatoes, and plenty of roasted green chiles.
- Breakfast burritos: Add chopped chiles to scrambled eggs, cheese, and bacon for an amazing morning meal.
- Green chile cheeseburger: Pile roasted chiles on top of a juicy burger with melted pepper jack cheese.
- Quesadillas: Mix chopped chiles with cheese and fold into a crispy tortilla.
- Cornbread: Fold roasted chiles into your favorite cornbread batter for a spicy twist.
- Enchilada sauce: Blend roasted chiles with garlic, cumin, and broth for a homemade green sauce.
If you love roasting peppers, you might also enjoy learning how to roast vegetables in the oven. The technique is similar and opens up a world of delicious possibilities.
Comparing Roasting Methods: Oven vs. Grill vs. Stovetop
While oven roasting is the most convenient method, there are other ways to roast Hatch chiles. Here is a quick comparison:
| Method | Flavor | Convenience | Best For |
|---|---|---|---|
| Oven Broiler | Great smoky flavor | Very easy, works in any weather | Large batches, year-round use |
| Outdoor Grill | Best smoky flavor | Requires outdoor space and good weather | |
| Stovetop (Open Flame) | Excellent char, very authentic | Only works with gas stovetop, small batches | Small quantities, quick roasting |
The oven broiler method wins for convenience and consistency. You do not need special equipment, and you can roast a large batch all at once. However, if you have a grill and the weather is nice, grilling adds an extra layer of smokiness that is hard to beat.
Tips for Roasting Hatch Chiles in Oven Like a Pro
After years of roasting chiles, I have picked up a few tricks that make the process even better.
Mix Heat Levels
Buy a combination of mild, medium, and hot chiles. Roast them all together, then mix them when you use them. This gives your dishes a more complex, layered heat.
Save the Roasting Liquid
After peeling, you will notice some flavorful liquid left in the bowl. Do not throw it away. Add it to soups, sauces, or rice for an extra punch of chile flavor.
Use a High-Quality Broiler
Not all broilers are created equal. If your oven has a powerful broiler, your chiles will roast faster and more evenly. If your broiler is weak, you may need to extend the roasting time slightly.
Roast Other Peppers Too
While you have the broiler going, consider roasting some Hatch green chiles alongside other peppers like Anaheim, poblano, or even bell peppers. They all roast beautifully using the same method.
Safety Tips When Handling Hot Hatch Chiles
Hatch chiles are generally mild to medium in heat, but they can still cause irritation. Here are some safety tips:
- Always wear gloves: Disposable nitrile or latex gloves protect your hands from the capsaicin oils.
- Avoid touching your face: Especially your eyes and nose. The oils can cause a burning sensation that lasts for hours.
- Wash your hands thoroughly: Even with gloves, wash your hands with soap and water after handling chiles.
- Ventilate your kitchen: Roasting chiles can produce smoke. Turn on your exhaust fan and open a window if possible.
- Do not breathe in the steam: When you open the steaming bowl, keep your face away from the hot vapor.
Frequently Asked Questions About Roasting Hatch Chiles
Can I roast Hatch chiles from frozen?
Yes, you can roast frozen Hatch chiles, but the texture will be slightly softer. Spread them on a baking sheet and broil as usual, adding a few extra minutes to the roasting time. Fresh chiles always yield the best results, though.
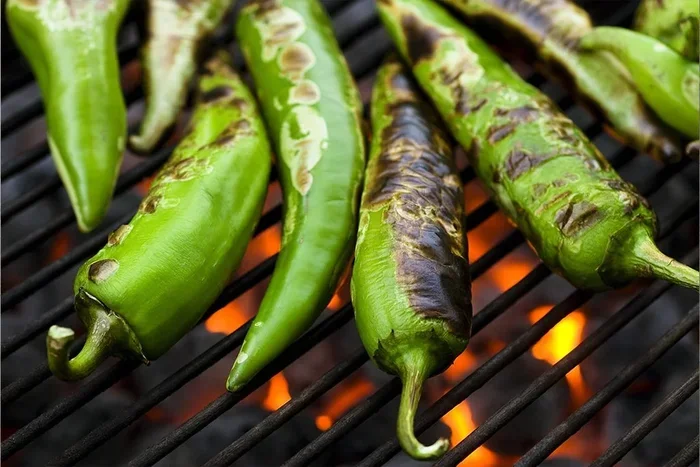
Visual guide about roasted hatch chiles
Image source: friedas.com
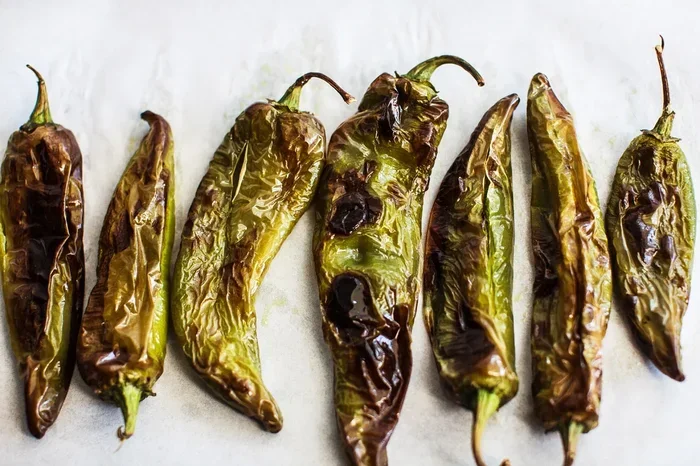
Visual guide about roasted hatch chiles
Image source: foodisafourletterword.com
How do I know when my Hatch chiles are done roasting?
Your chiles are done when the skin is blistered and charred all over, and the flesh feels soft when pressed with tongs. The entire surface should be covered in dark spots and blackened areas.
Do I need to remove all the charred skin?
No, you do not need to remove every bit. A few remaining flecks of char add great flavor. Just peel away the large pieces of blistered skin and leave the rest.
Can I roast Hatch chiles in a toaster oven?
Yes, a toaster oven works well for small batches. Use the broil setting and follow the same steps. Just make sure the chiles fit in a single layer with space between them.
How long do roasted Hatch chiles last in the freezer?
Properly stored in airtight freezer bags, roasted Hatch chiles will keep for up to 6 months. They may lose a little texture over time, but the flavor remains excellent.
What is the best variety of Hatch chile for roasting?
Big Jim is widely considered the best variety for roasting. It has thick walls, a mild to medium heat level, and a rich, flavorful flesh. Sandia is another popular choice if you prefer a bit more heat.
Conclusion
Learning how to roast hatch chiles in oven is one of the most rewarding kitchen skills you can develop. It is simple, affordable, and gives you access to one of the most delicious flavors in the culinary world. With just a broiler, a baking sheet, and a little patience, you can transform fresh Hatch chiles into smoky, tender peppers that elevate any dish.
Remember to choose fresh, firm chiles. Use your broiler on high heat. Let them steam after roasting. And always wear gloves when handling them. Follow these steps and you will have perfectly roasted chiles every time.
Now go grab a big bag of Hatch chiles while they are in season. Roast them, freeze them, and enjoy that incredible Southwestern flavor all year long. Your taste buds will thank you.