Roasting chili peppers in the oven is one of the easiest ways to unlock deep, smoky flavor for salsas, sauces, and everyday cooking. In this guide, you’ll learn the best oven temperature for roasting peppers, how to blister and peel them perfectly, and tips for storing your roasted chilies so they stay fresh for weeks.
Roasting chili peppers in the oven transforms ordinary peppers into something extraordinary. That tough, raw skin turns soft and smoky. The flesh becomes tender and rich with flavor you just can’t get from a skillet or a raw slice.
Whether you’re making homemade salsa, adding depth to a soup, or prepping peppers for the freezer, oven roasting is the go-to method for home cooks and professional chefs alike. It’s simple, hands-off, and delivers consistent results every single time.
In this guide, we’ll walk you through everything you need to know — from picking the right peppers to storing your finished product. Let’s fire up that oven.
- Use high heat (425°F–450°F): High temperatures blister the skin quickly, making peeling effortless and locking in smoky flavor.
- Line your baking sheet: Use parchment paper or foil for easy cleanup and to prevent peppers from sticking.
- Steam after roasting: Transfer hot peppers to a bowl and cover with plastic wrap for 10–15 minutes — this loosens the skin for easy peeling.
- Wear gloves when handling: Chili oils can irritate skin and eyes, especially with hotter varieties like habaneros or serranos.
- Store properly: Refrigerate in an airtight container for up to a week, or freeze with olive oil for up to six months.
- Any chili works: From mild poblanos and Anaheim peppers to spicy jalapeños and serranos, the roasting method is the same.
- Versatile ingredient: Use roasted peppers in soups, tacos, dips, pasta, sandwiches, and homemade hot sauce.
Quick Answers to Common Questions
What temperature is best for roasting chili peppers?
The ideal temperature is between 425°F and 450°F. High heat creates the blistered, charred skin that gives roasted peppers their signature smoky flavor and makes peeling easy.
How long does it take to roast chili peppers in the oven?
Most peppers take 20 to 30 minutes at 425°F. Smaller peppers like serranos may finish in about 18 minutes, while larger poblanos can take the full 30 minutes.
Do you need to peel roasted chili peppers?
Yes, peeling is recommended. The skin becomes tough and papery after roasting and doesn’t blend well into sauces or dips. Steaming the peppers for 10–15 minutes after roasting makes the skin slide right off.
Can you roast chili peppers without oil?
You can, but a light coating of olive oil helps the peppers char evenly and prevents them from drying out. It also makes cleanup easier since oiled peppers are less likely to stick to the pan.
How do you store roasted chili peppers?
Store them in an airtight container in the refrigerator for up to 7 days. For long-term storage, freeze them in a freezer bag or covered in olive oil in ice cube trays for up to six months.
📑 Table of Contents
- Why Roast Chili Peppers in the Oven?
- Choosing the Right Chili Peppers for Roasting
- How to Roast Chili Peppers in the Oven: Step-by-Step
- Expert Tips for Perfect Roasted Chili Peppers
- Common Mistakes to Avoid
- How to Store Roasted Chili Peppers
- Delicious Ways to Use Roasted Chili Peppers
- Roasting Peppers in a Toaster Oven
- Conclusion
Why Roast Chili Peppers in the Oven?
Before we dive into the how, let’s talk about the why. Roasting does something magical to chili peppers. It breaks down the cell walls, softens the flesh, and creates those beautiful charred spots that add a smoky, almost sweet complexity.
Enhanced Flavor and Texture
Raw peppers have a bright, sometimes harsh flavor. Roasting mellows that out completely. The natural sugars caramelize, and the skin blisters away, leaving behind a tender, silky texture that blends beautifully into sauces, dips, and stews.
Easy Peeling
If you’ve ever tried to peel a raw pepper, you know it’s nearly impossible. The skin clings stubbornly to the flesh. Roasting changes everything. Once steamed, the skin slides right off with minimal effort — no paring knife required.
Batch Cooking Made Simple
Unlike grilling or broiling, the oven lets you roast a whole tray of peppers at once. This makes it perfect for meal prep, canning season, or when you need a big batch of roasted peppers for a recipe. Speaking of working with peppers, if you’ve ever wondered how to roast red peppers in the oven perfectly every time, the same principles we cover here apply across the board.
Choosing the Right Chili Peppers for Roasting

Visual guide about roasted chili peppers
Image source: chilipeppermadness.com
Not all peppers are created equal, but honestly, almost any chili pepper can be roasted. The method stays the same regardless of variety. What changes is the heat level and the best use for each type.
Mild to Medium Peppers
These are the most popular choices for roasting because they’re versatile and approachable:
- Poblano peppers — Earthy and mild, perfect for chiles rellenos or rajas
- Anaheim peppers — Slightly sweet, great for green chile sauces
- Bell peppers — Sweet with no heat, ideal for salads and sandwiches
- Hatch green chiles — A regional favorite with a unique smoky-sweet flavor
If you’re working with Hatch chiles specifically, you might want to check out our guide on how to roast Hatch green chiles in the oven for variety-specific tips.
Hot Peppers
Love the heat? These roasting favorites bring serious spice:
- Jalapeños — The classic choice for poppers, nachos, and salsa
- Serrano peppers — Hotter than jalapeños, great for hot sauce
- Habanero peppers — Fruity and fiery, use sparingly
Important note: Always wear gloves when handling hot peppers. The capsaicin oil can cause serious irritation to your skin and eyes.
How to Roast Chili Peppers in the Oven: Step-by-Step
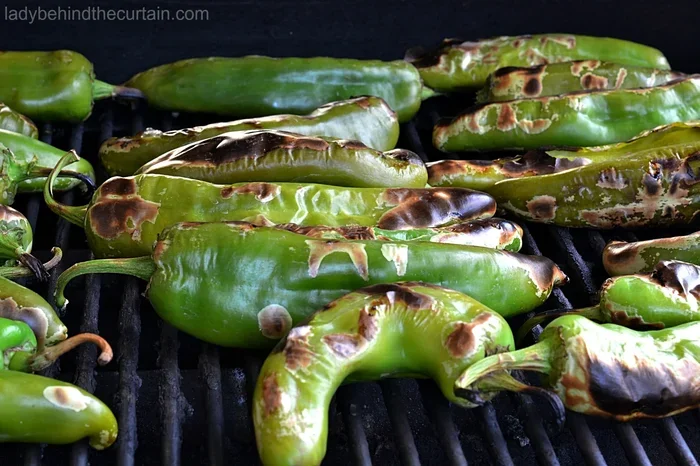
Visual guide about roasted chili peppers
Image source: ladybehindthecurtain.com
Now for the main event. Follow these steps and you’ll have perfectly roasted chili peppers every single time.
What You’ll Need
- Fresh chili peppers (any variety)
- Baking sheet
- Parchment paper or aluminum foil
- Olive oil or cooking spray
- Tongs
- Large bowl
- Plastic wrap or a clean kitchen towel
Step 1: Preheat Your Oven
Set your oven to 425°F to 450°F. You want it screaming hot. This high temperature is what creates those beautiful blisters and charred spots on the pepper skin. Give the oven at least 10–15 minutes to fully preheat.
If you’re using a convection oven, reduce the temperature by about 25°F. Convection circulates hot air more efficiently, so your peppers will blister even faster. For more on convection cooking, our guide on how to cook a prime rib roast in a convection oven covers the basics of convection settings.
Step 2: Prep the Peppers
Wash your peppers under cool running water and pat them dry. Cut them in half lengthwise and remove the seeds and white membranes if you want to reduce the heat. For milder results, remove everything inside. For more heat, leave some of the white ribs intact — that’s where most of the capsaicin lives.
Brush or drizzle the peppers lightly with olive oil. This helps them roast evenly and prevents drying out. Place them cut-side down on your lined baking sheet.
Step 3: Arrange on the Baking Sheet
Spread the peppers in a single layer with a little space between each one. Don’t overcrowd the pan. If the peppers are piled on top of each other, they’ll steam instead of roast, and you won’t get those gorgeous char marks.
Use two baking sheets if needed. It’s better to give them room than to rush the process.
Step 4: Roast Until Blistered
Slide the baking sheet into the oven and roast for 20 to 30 minutes. The exact time depends on the size and thickness of your peppers. Smaller peppers like serranos may be done in 18 minutes. Larger poblanos might need the full 30.
You’ll know they’re ready when the skin is blistered and charred in spots. The flesh should look soft and collapsed. You can flip them halfway through for even roasting, but it’s not strictly necessary if you started cut-side down.
Step 5: Steam the Peppers
This is the step most beginners skip, and it makes all the difference. As soon as the peppers come out of the oven, transfer them to a large bowl. Cover the bowl tightly with plastic wrap or invert a plate over the top.
Let them steam for 10 to 15 minutes. The trapped heat and moisture will loosen the skin from the flesh, making peeling a breeze. Think of it like a mini sauna for your peppers.
Step 6: Peel and Use
After steaming, the skin should slide right off. Use your fingers or a paper towel to gently rub away the charred skin. Don’t rinse them under water — you’ll wash away all that delicious smoky flavor.
Now your roasted chili peppers are ready to use. Chop them, blend them, or store them for later. The possibilities are endless.
Expert Tips for Perfect Roasted Chili Peppers
These pro-level tips will take your roasted peppers from good to absolutely incredible.
Don’t Skip the Oil
A light coating of olive oil does three things: it prevents sticking, helps the peppers char evenly, and adds a subtle richness to the final flavor. You don’t need much — just a thin brush or a quick spritz of cooking spray.
Use the Right Rack Position
Place your baking sheet on the middle or upper-middle rack. This gives the peppers the most direct heat exposure. If you’re using the broiler method (more on that below), move the rack to the top position.
Rotate the Pan
If your oven has hot spots — and most do — rotate the baking sheet 180 degrees halfway through roasting. This ensures even charring on all the peppers.
Combine Oven and Broiler for Extra Char
Want that deep, smoky char without a grill? Roast your peppers at 425°F for about 15 minutes, then switch to broil for 5 to 8 minutes. Watch them closely — broilers work fast. This two-step method gives you the best of both worlds: tender flesh with a smoky, blistered exterior. For more broiling techniques, check out how to broil in the oven.
Common Mistakes to Avoid
Even a simple process like roasting peppers can go wrong if you’re not careful. Here are the most common pitfalls and how to avoid them.
Roasting at Too Low a Temperature
If your oven isn’t hot enough, the peppers will soften without blistering. You’ll end up with steamed peppers instead of roasted ones. Always preheat to at least 425°F.
Overcrowding the Pan
This is probably the number one mistake home cooks make. When peppers are packed too tightly, they trap moisture and steam instead of roasting. Give them space. Use multiple trays if necessary.
Skipping the Steaming Step
Without the steam rest, peeling roasted peppers becomes a frustrating chore. The skin sticks to the flesh, and you end up losing half the pepper in the process. Always steam for 10–15 minutes before peeling.
Rinsing After Peeling
Resist the urge to rinse peeled peppers under the tap. You’ll wash away the smoky flavor you worked so hard to create. Just rub off the skin with your fingers or a paper towel.
Not Wearing Gloves with Hot Peppers
Capsaicin is no joke. Touch your eyes or face after handling jalapeños or habaneros, and you’ll regret it. Always wear disposable gloves when cutting and seeding hot chili varieties.
How to Store Roasted Chili Peppers
One of the best things about roasting peppers is that they store beautifully. You can make a big batch and enjoy them for weeks — or even months.
Refrigerator Storage
Place peeled roasted peppers in an airtight container. They’ll keep in the fridge for up to 5 to 7 days. Some people like to drizzle a little olive oil over them before sealing — this helps preserve moisture and adds flavor.
Freezer Storage
For long-term storage, freezing is your best friend. Lay the peeled peppers in a single layer on a baking sheet and freeze until solid. Then transfer them to a freezer bag, pressing out as much air as possible. They’ll keep for up to six months.
Another popular method is to chop the roasted peppers, place them in an ice cube tray, cover with olive oil, and freeze. Pop out the cubes and toss them directly into soups, sauces, or stir-fries.
Canning and Preserving
If you’re into home canning, roasted chili peppers preserve beautifully in jars with a little vinegar or lemon juice. This is a great way to enjoy summer peppers all year long.
Delicious Ways to Use Roasted Chili Peppers
Now that you’ve got a bowl of perfectly roasted peppers, what do you do with them? The options are truly endless.
- Salsas and dips — Blend with tomatoes, onion, garlic, and cilantro for an instant roasted salsa
- Soups and stews — Add depth to tortilla soup, chili, or pozole
- Sandwiches and wraps — Layer onto sandwiches with cheese, avocado, and grilled chicken
- Pasta sauces — Blend into marinara or cream sauce for a smoky twist
- Eggs — Fold into scrambled eggs, frittatas, or omelets
- Tacos and burritos — A natural pairing with almost any Mexican-inspired dish
- Homemade hot sauce — Blend roasted hot peppers with vinegar and garlic
If you love roasting vegetables as much as you love peppers, you might also enjoy our guide on how to roast vegetables in the oven — many of the same principles apply.
Roasting Peppers in a Toaster Oven
Don’t have a full-size oven? No problem. A toaster oven works great for roasting smaller batches of chili peppers. The process is nearly identical.
Cut your peppers in half, oil them lightly, and place them cut-side down on a small baking sheet or toaster oven tray. Roast at 425°F for 15 to 25 minutes, depending on the size. Steam and peel just like you would with a full-size oven.
The only difference is that toaster ovens heat up faster and have a smaller capacity. So keep a close eye on the peppers — they can go from perfectly charred to burnt in just a couple of minutes.
Conclusion
Roasting chili peppers in the oven is one of the simplest techniques in the kitchen, and it delivers some of the biggest flavor returns. With just a hot oven, a little oil, and some patience, you can transform raw peppers into smoky, tender, incredibly versatile ingredients.
Remember the key steps: high heat, single-layer arrangement, steam rest, and gentle peeling. Avoid the common mistakes of overcrowding and skipping the steam, and you’ll nail it every time.
So the next time you see a bag of fresh chili peppers at the market, grab them. Roast a big batch, store them properly, and you’ll have a secret weapon in your fridge ready to elevate any meal.