Roasting a chicken in a convection oven is one of the easiest ways to get perfectly golden, crispy skin with juicy meat every single time. Convection ovens circulate hot air evenly, which means faster cooking, better browning, and more flavor. In this guide, we’ll walk you through everything you need to know — from prep to plating — so you can master this technique with confidence.
There’s something deeply satisfying about pulling a perfectly roasted chicken out of the oven. The skin is golden and crackling. The meat is tender and juicy. And the aroma fills your entire kitchen. If you’ve ever struggled with uneven cooking or dry poultry, a convection oven might just be your secret weapon.
Roasting a chicken in a convection oven is a game-changer for home cooks. The fan-assisted heat circulation means your chicken cooks more evenly, browns more beautifully, and finishes faster than in a standard oven. Whether you’re a beginner or a seasoned cook looking to refine your technique, this guide will walk you through every step.
By the time you finish reading, you’ll know exactly how to prep, season, roast, and rest your chicken for restaurant-quality results at home. Let’s get started.
- Lower the temperature by 25°F compared to a conventional oven — convection cooks faster and more evenly.
- Pat the chicken completely dry before seasoning for the crispiest, most golden skin possible.
- Use a meat thermometer and cook until the internal temperature reaches 165°F in the thickest part of the thigh.
- Let the chicken rest for 10–15 minutes after roasting to lock in juices and ensure tender meat.
- Trussing the chicken helps it cook evenly and gives it a beautiful, professional presentation.
- Convection roasting typically takes 20% less time than conventional roasting, so keep a close eye on it.
- Season generously under the skin and on the surface for maximum flavor throughout the meat.
Quick Answers to Common Questions
What temperature should I set my convection oven to roast a chicken?
Set your convection oven to 400°F for a standard 4-pound chicken. This is about 25°F lower than you’d use in a conventional oven, since convection cooks more efficiently.
How long does it take to roast a chicken in a convection oven?
A 4-pound chicken typically takes 55 to 70 minutes at 400°F on the convection setting. Always use a meat thermometer and cook until the internal temperature reaches 165°F in the thigh.
Do I need to cover the chicken while roasting?
No, leave it uncovered. Covering the chicken traps steam and prevents the skin from crisping up. The convection air circulation does the work of browning the skin evenly.
Should I use a roasting rack?
Yes, a roasting rack is highly recommended. It elevates the chicken so hot air circulates underneath, preventing the bottom from getting soggy and ensuring even cooking all around.
Can I roast vegetables at the same time as the chicken?
Absolutely. Place chopped vegetables like potatoes, carrots, and onions on the pan beneath the roasting rack. They’ll catch the drippings and roast beautifully alongside the chicken.
📑 Table of Contents
- What Makes a Convection Oven Different?
- Choosing the Right Chicken for Roasting
- How to Prep Your Chicken for Convection Roasting
- Convection Oven Settings and Temperature
- Step-by-Step: How to Roast a Chicken in a Convection Oven
- Common Mistakes to Avoid
- Flavor Variations and Recipe Ideas
- Tips for the Best Convection Roast Chicken
- How to Carve a Roast Chicken
- Storing and Reheating Leftovers
- Conclusion
What Makes a Convection Oven Different?
Before we dive into the roasting process, it helps to understand what sets a convection oven apart. A convection oven uses a fan and exhaust system to circulate hot air around the food. This eliminates hot spots and creates a consistent temperature throughout the oven cavity.
In a conventional oven, heat rises from the bottom and can create uneven pockets of warm and cool air. The result? Parts of your chicken might overcook while others stay underdone. With convection, the moving air wraps around the chicken evenly, cooking it from all directions at once.
Why Convection Is Better for Roasting Chicken
Here’s why convection roasting is ideal for poultry:
- Faster cooking times: Convection typically reduces cooking time by about 20–25%. A chicken that takes 90 minutes in a conventional oven might be done in 65–70 minutes.
- Crispier skin: The circulating air dries out the skin more effectively, leading to that beautiful golden crunch we all love.
- Even browning: No more pale spots or burnt patches. The whole chicken browns uniformly.
- Juicier meat: Because the cooking time is shorter, the meat retains more moisture.
If you’re also interested in other convection cooking methods, check out our guide on how to cook a prime rib roast in a convection oven for more tips on mastering this technique with different proteins.
Choosing the Right Chicken for Roasting
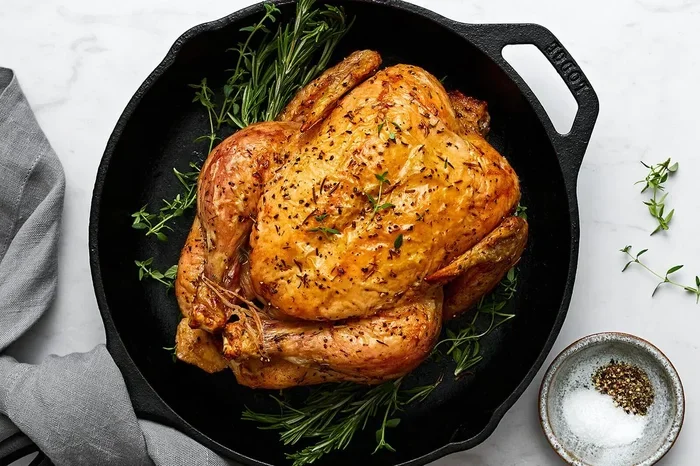
Visual guide about roasted chicken convection oven
Image source: recipes.net
Not all chickens are created equal when it comes to roasting. The quality and size of your bird will affect both the cooking time and the final result.
What Size Chicken Should You Use?
For most home ovens, a 3.5 to 4.5-pound whole chicken is the sweet spot. It’s large enough to feed a family but small enough to cook evenly without drying out. Larger birds (5–7 pounds) can work too, but they require more careful temperature management.
Fresh vs. Frozen
Always start with a fully thawed chicken for the best results. Roasting a partially frozen bird leads to uneven cooking — the outside may burn while the inside stays raw. If you’re using a frozen chicken, thaw it in the refrigerator for 24–48 hours before roasting.
Organic, Free-Range, or Conventional?
This comes down to personal preference and budget. Free-range and organic chickens often have more flavor and firmer texture. But a conventional roasting chicken will still taste fantastic when prepared correctly. Don’t stress too much about this — the roasting technique matters more than the label.
How to Prep Your Chicken for Convection Roasting
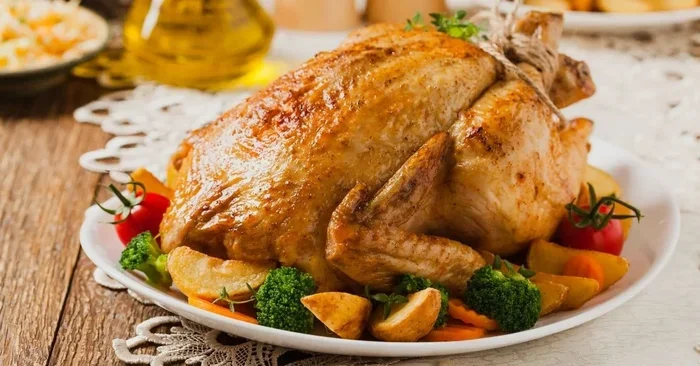
Visual guide about roasted chicken convection oven
Image source: insanelygoodrecipes.com
Proper preparation is the foundation of a great roast chicken. Skipping these steps is the number one reason people end up with soggy skin or bland meat.
Step 1: Remove the Giblets and Pat Dry
Take the chicken out of its packaging and remove the giblets from the cavity. Then — and this is critical — pat the entire chicken completely dry with paper towels. Dry skin is the single most important factor for achieving that crispy, golden exterior. Don’t skip this step.
Step 2: Season Generously
Seasoning is where you can get creative. At a minimum, you’ll want:
- Kosher salt — about 1 teaspoon per pound of chicken
- Freshly ground black pepper
- Olive oil or melted butter — to help the seasonings stick and promote browning
For extra flavor, try adding:
- Garlic powder and onion powder
- Paprika (smoked paprika adds a wonderful depth)
- Dried thyme, rosemary, or oregano
- Lemon zest rubbed under the skin
Step 3: Season Under the Skin
This is a pro tip that makes a huge difference. Gently loosen the skin from the breast and thighs with your fingers. Rub softened butter or olive oil mixed with herbs and garlic directly onto the meat under the skin. This flavors the meat from the inside out and keeps it incredibly moist.
Step 4: Truss the Chicken
Trussing means tying the legs together with kitchen twine and tucking the wing tips under the body. This helps the chicken cook evenly and gives it a neat, compact shape. It’s not absolutely necessary, but it makes a noticeable difference in both appearance and cooking consistency.
Convection Oven Settings and Temperature
Getting the temperature right is crucial. Because convection ovens cook more efficiently, you need to make a simple adjustment.
The Golden Rule: Reduce Temperature by 25°F
If a recipe calls for roasting at 425°F in a conventional oven, set your convection oven to 400°F. This prevents the outside from overcooking before the inside reaches a safe temperature.
For most convection roast chickens, the ideal temperature range is:
- 375°F to 425°F (convection setting)
- 400°F is the sweet spot for most 4-pound chickens
Use the Convection Roast Setting if Available
Many modern ovens have a dedicated “convection roast” setting. This combines the fan circulation with a slightly different heating element pattern optimized for meats. If your oven has it, use it. If not, the standard convection bake setting works perfectly fine.
Position the Rack in the Center
Place your oven rack in the center position. This ensures the circulating air reaches all sides of the chicken evenly. Avoid placing it too close to the top or bottom heating elements.
Step-by-Step: How to Roast a Chicken in a Convection Oven
Now let’s put it all together. Here’s your complete step-by-step process.
Step 1: Preheat Your Oven
Preheat your convection oven to 400°F. Give it at least 10–15 minutes to fully preheat. A properly preheated oven ensures the chicken starts cooking immediately, which helps with browning.
Step 2: Prepare the Roasting Pan
Place the chicken on a roasting rack set inside a shallow pan. The rack elevates the chicken so air can circulate underneath, preventing the bottom from getting soggy. If you don’t have a roasting rack, you can create one by crumpling aluminum foil into rings or using chopped vegetables (onions, carrots, celery) as a bed.
Step 3: Roast the Chicken
Place the chicken breast-side up in the oven. For a 4-pound chicken at 400°F convection, expect a total roasting time of approximately 55 to 70 minutes.
Here’s a general timing guide:
- 3-pound chicken: 45–55 minutes
- 4-pound chicken: 55–70 minutes
- 5-pound chicken: 65–80 minutes
Step 4: Check the Internal Temperature
The only reliable way to know your chicken is done is to use an instant-read meat thermometer. Insert it into the thickest part of the thigh without touching the bone. The chicken is safe to eat when it reaches an internal temperature of 165°F.
Also check the breast — it should read at least 160°F, as it will continue to rise a few degrees while resting.
Step 5: Let It Rest
Once the chicken reaches temperature, remove it from the oven and let it rest for 10 to 15 minutes before carving. This allows the juices to redistribute throughout the meat. Cutting into it too early will cause all those flavorful juices to run out onto the cutting board.
Tent the chicken loosely with aluminum foil while it rests to keep it warm.
Common Mistakes to Avoid
Even experienced cooks make these errors. Here’s what to watch out for:
Not Drying the Skin
Wet skin steams instead of roasts. Always pat your chicken thoroughly dry. For extra crispy skin, you can even leave the uncovered chicken in the fridge for a few hours or overnight to air-dry the surface.
Skipping the Thermometer
Guessing doneness by color or juice color is unreliable. A meat thermometer is the only accurate way to confirm your chicken is cooked through. They’re inexpensive and invaluable.
Overcrowding the Pan
Give your chicken plenty of space. If you’re roasting vegetables alongside, make sure they’re not packed tightly around the bird. Air needs to circulate freely for convection to work its magic.
Not Letting It Rest
We know it’s tempting to dig in right away. But resting is non-negotiable for juicy results. Those few minutes make all the difference.
Using Too High a Temperature
Because convection is more efficient, cranking the heat too high will burn the outside before the inside cooks. Stick with the 25°F reduction rule and you’ll be fine.
Flavor Variations and Recipe Ideas
Once you’ve mastered the basic technique, the flavor possibilities are endless. Here are some of our favorite variations:
Lemon Herb Roast Chicken
Stuff the cavity with lemon halves, garlic cloves, and fresh rosemary sprigs. Rub the outside with a mixture of olive oil, lemon zest, minced garlic, and chopped herbs. Bright, fresh, and classic.
Smoky Paprika and Garlic
Mix smoked paprika, garlic powder, cumin, and a touch of cayenne with olive oil. Rub it all over the chicken for a warm, smoky flavor with a hint of heat.
Honey Mustard Glazed Chicken
During the last 15 minutes of roasting, brush the chicken with a mixture of honey, Dijon mustard, and a splash of apple cider vinegar. The glaze caramelizes beautifully in the convection oven.
Spatchcocked (Butterflied) Chicken
For even faster cooking, try removing the backbone and flattening the chicken. This technique, also known as butterflying, reduces cooking time significantly and maximizes crispy skin surface area. If you want to try this method, our guide on how to cook a butterfly chicken in the oven has all the details.
Tips for the Best Convection Roast Chicken
Here are some additional expert tips to take your roast chicken to the next level:
- Start with a room-temperature chicken. Let it sit on the counter for 20–30 minutes before roasting. This helps it cook more evenly.
- Baste halfway through. Use the pan juices to baste the chicken at the halfway point for extra moisture and flavor.
- Add aromatics to the cavity. Onions, garlic, lemon, and fresh herbs inside the cavity infuse the meat with incredible flavor from the inside.
- Roast vegetables underneath. Potatoes, carrots, and onions placed under the roasting rack will catch the drippings and become incredibly flavorful. For more on roasting vegetables, check out our guide on how to bake vegetables in the oven for perfect flavor every time.
- Use a light coating of oil or butter. This promotes even browning and helps the seasoning adhere to the skin.
- Don’t open the oven door too often. Each time you open it, heat escapes and extends the cooking time. Use the oven light and window to check progress instead.
How to Carve a Roast Chicken
Once your chicken has rested, it’s time to carve. Here’s a quick method:
- Remove the legs. Cut through the skin between the thigh and breast. Pull the leg away and cut through the joint.
- Separate the thigh and drumstick. Find the joint and cut through it.
- Remove the wings. Cut through the joint where the wing meets the body.
- Slice the breast meat. Make horizontal cuts along the breastbone, slicing downward to create even pieces.
- Arrange on a platter and spoon any resting juices over the top.
Storing and Reheating Leftovers
Roast chicken leftovers are a gift. Here’s how to store and reheat them properly.
Storage
Store carved chicken in an airtight container in the refrigerator for up to 4 days. You can also freeze it for up to 3 months.
Reheating
To reheat without drying out the meat, sprinkle a little broth or water over the chicken, cover it loosely, and warm it in a 300°F oven for 10–15 minutes. The convection setting works great for reheating too — just keep the temperature low and check frequently.
Conclusion
Roasting a chicken in a convection oven is one of the most rewarding cooking skills you can develop. The circulating hot air does the heavy lifting, giving you crispy skin, juicy meat, and even browning with minimal effort. Remember the key principles: dry the skin thoroughly, reduce your temperature by 25°F, season generously (especially under the skin), use a meat thermometer, and always let the bird rest before carving.
Once you’ve nailed the basic technique, experiment with different seasonings, stuffings, and glazes to make it your own. And don’t forget — the pan drippings make an incredible gravy. Simply deglaze the roasting pan with a splash of chicken broth, whisk in a little flour or cornstarch, and simmer until thickened.
Now go roast that chicken. You’ve got this.